Idli is made from a soft and thick batter comprising rice and urad dal paste. It is steamed in specially designed idli molds to perfection. You may follow the steps as mentioned in my recipe to make idli at home.

KEY TAKEAWAYS
- Idli is a traditional South Indian dish but is widely consumed all over India.
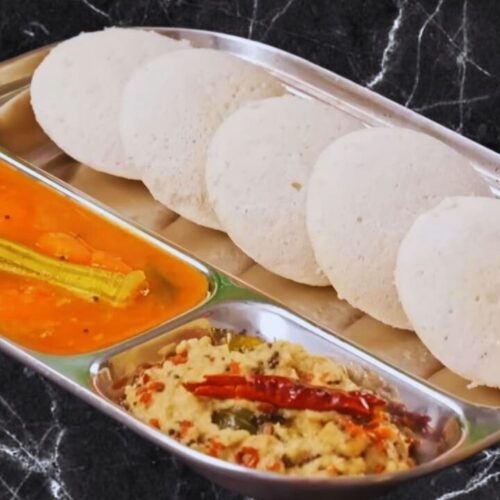
- Serve it traditionally with chilled coconut chutney and hot sambar.
- Idli tastes slightly sour and creamy.
- Other similar recipes are dosa, uttapam, appam, and medu vada.
The Ingredients:
- 3 cups rice (small grains)
- 1 cup urad dal
- 1 tsp methi seeds
- Salt to taste
- Baking soda (optional, a pinch)
- Cooking oil (as required for greasing the idli mold)

I got this recipe from an autorickshaw driver’s daughter, whom I met during an annual sports event in my son’s school, where she was selling these soft and wonderfully tasty idlis. They were an instant hit. The smell and the texture attracted me, and I asked for a plate. While eating, I asked who made these idlis, and she said, “My mother makes them often.” I inquired whether she would get the recipe for me, which she did the next day.
I followed the steps as written by her mother when I made them on the weekend. They turned out exceptionally well. My husband said it was “real and grounded,” and the boys enjoyed it completely. Now, this dish reminds me how flavors travel between lives quietly.
How to Make Idli? (Step by Step Guide with Images)
Step 1: In a bowl, take 3 cups of rice (small grains) and wash them nicely. Add 1 tsp of methi seeds to it. Add enough water to it, cover it, and keep it aside to soak for about 5 to 6 hours as well.

(Pro tip: Additionally, you may add 2 to 3 tablespoons of poha to it. This will make your idlis softer).
Step 2: Now, in a separate bowl, take 1 cup of urad dal and wash it nicely. Then add enough water, cover it, and leave it to soak for about 5 to 6 hours.

(Pro tip: The ratio of rice and urad dal should be 3:1. Ideally, to achieve the best results, soak the rice and dal overnight, though I have soaked them for about 6 hours only).
Step 3: After 6 hours, drain the water from the rice and urad dal. First, put the soaked urad dal in a mixer and add a little bit of water to it. Grind it into a fine paste.

Step 4: Check the texture of the paste. It should be absolutely smooth as shown in the image below. If it is not, grind it a couple of times more. Then transfer the paste to a mixing bowl.

Step 5: Now, in the same mixer, put half of the soaked rice, add some water, and grind it into a fine paste. Check the texture. If it is perfect, transfer it to the mixing bowl containing the urad dal paste. Repeat the process to grind the other half of the soaked rice.

Step 6: Now, mix the two types of paste nicely with your hand. Be patient and do not rush the process. Check the consistency. It should be free-flowing as shown in the image below.

(Pro tip: Always mix idli batter with your hand. Typically, hands have good bacteria that helps in proper fermentation of the batter).
Step 7: Cover the bowl and let it rest for at least 8 to 10 hours or overnight. Remove the cover after 10 hours to check. The idli batter should swell up by now, as shown in the image below.

Step 8: Now, add salt to taste and mix it nicely with the batter. Check the consistency. Whisk the batter until it becomes light, fluffy, and free-flowing as shown in the image below. You may optionally add a pinch of baking soda to it to make your idlis softer and fluffier.

Step 9: Now, put some water in a steamer and let it come to a boil. In the meantime, grease the idli mold with a little bit of cooking oil. Pour the batter in each mold carefully.

(Pro tip: Do not fill the mold with the batter. Pour just half of it because the idlis will puff up after steaming).
Step 10: Place the mold in the steamer. Make sure that the idli or the idli mold does not touch the water. Cover the steamer and let the idlis steam on a medium flame for about 15 minutes.

Step 11: Remove the cover after 15 minutes. The idlis will have swollen nicely by now and become double the size of the batter poured, as you can see in the image below.

(Pro tip: Do not steam the idlis for more than 15 minutes, or else they will become hard).
Step 12: Remove each idli while they are still hot. Do it very carefully, as these will be very soft now. Check the softness from inside out.

Step 13: Your soft, fluffy, and healthy homemade idlis are ready to serve. Arrange them on a tray and serve hot along with sambar and coconut chutney.

Recipe Card
Idli
Ingredients
- 3 cups rice small grains
- 1 cup urad dal
- 1 tsp methi seeds
- Salt to taste
- Baking soda optional, a pinch
- Cooking oil as required for greasing the idli mold
Instructions
- In a bowl, take 3 cups of rice (small grains) and wash them nicely. Add 1 tsp of methi seeds to it. Add enough water to it, cover it and keep it aside to soak for about 5 to 6 hours as well. (Pro tip: Additionally, you may add 2 to 3 tablespoons of poha to it. This will make your idlis softer).
- Now, in a separate bowl, take 1 cup of urad dal and wash it nicely. Then add enough water, cover it and leave it to soak for about 5 to 6 hours. (Pro tip: The ratio of rice and urad dal should be 3:1. Ideally, to achieve the best results, soak the rice and dal overnight, though I have soaked them for about 6 hours only).
- After 6 hours, drain the water from the rice and urad dal. First, put the soaked urad dal in a mixer and add a little bit of water to it. Grind it into a fine paste.
- Check the texture of the paste. It should be absolutely smooth as shown in the image below. If it is not, grind it for a couple of times more. Then transfer the paste to a mixing bowl.
- Now, in the same mixer, put half of the soaked rice, add some water, and grind it into a fine paste. Check the texture. If it is perfect, transfer it to the mixing bowl containing the urad dal paste. Repeat the process to grind the other half of the soaked rice.
- Now, mix the two types of paste nicely with your hand. Be patient and do not rush the process. Check the consistency. It should be free flowing as shown in the image below. (Pro tip: Always mix idli batter with your hand. Typically, hands have good bacteria that helps in proper fermentation of the batter).
- Cover the bowl and let it rest for at least 8 to 10 hours or overnight. Remove the cover after 10 hours to check. The idli batter should swell up by now, as shown in the image below.
- Now, add salt to taste and mix it nicely with the batter. Check the consistency. Whisk the batter until it becomes light, fluffy, and free flowing as shown in the image below. You may optionally add a pinch of baking soda to it to make your idlis softer and fluffier.
- Now, put some water in a steamer and let it come to a boil. In the meantime, grease the idli mold with a little bit of cooking oil. Pour the batter in each mold carefully. (Pro tip: Do not fill the mold with the batter. Pour just half of it because the idlis will puff up after steaming).
- Place the mold in the steamer. Make sure that the idli or the idli mold does not touch the water. Cover the steamer and let the idlis steam on a medium flame for about 15 minutes.
- Remove the cover after 15 minutes. The idlis will have swollen nicely by now and become double the size of the batter poured, as you can see in the image below. (Pro tip: Do not steam the idlis for more than 15 minutes, or else they will become hard).
- Remove each idli while they are still hot. Do it very carefully as these will be very soft now. Check the softness from inside out.
- Your soft, fluffy, and healthy homemade idlis are ready to serve. Arrange them on a tray and serve hot along with sambar and coconut chutney.


")
